British India Coins & Notes Journey of history, that never ends
Nav view search
Navigation
Search
- You are here:
-
Home

-
Gallery
-
Gallery
-
British india Coins
-
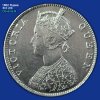
1862 Rupee Dot Varieties
-
Checklist and Pictures
-
No dot
-
Obverse B
- B II 2/0